
Roles: Team Lead, Lead Gameplay Developer, UI Designer/Developer, Artist
Roles: Team Lead, Lead Gameplay Developer, UI Designer/Developer, Artist
Roles: Team Lead, Lead Gameplay Developer, UI Designer/Developer, Artist
Roles: Team Lead, Lead Gameplay Developer, UI Designer/Developer, Artist
Toolkit: Unity, Aseprite, Photoshop, Audacity, MagicaVoxel
Toolkit: Unity, Aseprite, Photoshop, Audacity, MagicaVoxel
Toolkit: Unity, Aseprite, Photoshop, Audacity, MagicaVoxel
Toolkit: Unity, Aseprite, Photoshop, Audacity, MagicaVoxel
Term: 12 Weeks, Fall 2019
Term: 12 Weeks
Term: 12 Weeks
Team Size: 3 People
Team Size: 3 People
Team Size: 3 People
Course: Capstone, KSU
Course: Capstone, KSU
Course: Capstone, KSU
Arclight: The Tales of Auria
Arclight: The Tales of Auria
Arclight: The Tals of Auria
Overview
Overview
In the beginning...
It was summer 2018, and Wizard of Legend just released. Never had I enjoyed an indie title so much. What was it that I enjoyed so much? I kept asking myself this question over and over. Looking back, I remember playing Skyrim for the first time, and it brought back some of the same feelings. Two, 100% different, games gave me the same exciting feeling. For Skyrim, it was the infinite possibilities with skills that encaptured me. Then I figured it out. That was the cross between the two. Wizard of Legend, a small indie roguelike based on fast-paced twisty combat. Skyrim, an open world, choose your own adventure RPG. That was the basis for Arclight; fast-paced, visually appealing, and impactful combat. Because combat alone isn't enough for a game, we decided to follow the Skyrim path and give a valiant effort at creating a small RPG experience.
Game Idea:
Arclight is an Action-Adventure game with mild exploration, in-depth combat, and fleshed out storytelling. Players will travel across the land of Auria by completing and learning about the varied characters and their respective story arcs. Players will be able to play as one character at a time, focusing on improving and polishing each character’s statistics and play-style. The objective of the game is to work together with a band of party members, or with friends, to complete every chapter and finally resolve the conflicts within Auria. (We designed the game based on the idea of having the entire lore skeletoned out, and ready for expansion upon development)
Goals:
1. Find an art style that is easily attainable within the small amount of time we had.
2. Using the MDA formula, design an engaging player experience.
3. Ensure the art and development unify into a cohesive player experience.
4. Develop fun, fast-paced combat.
What kind of game will it be?
Genre: Adventure-RPG
Art Direction: Cell-Shaded Voxel based 3D, with Pixel Art Characters and Effects.
Camera Model: 3rd Person 2.5D Perspective
Contributions
Character Art:
From the beginning, I was heavily inspired by Wizard of Legend. I loved how much detail they were able to provide within a 32p x 32p frame. So, moving forward from that I created an inspiration board and started cranking on the Assets. Since this was a 12-week project, we decided as a team it was better to focus on one of our five fleshed out characters. The character of choice, Iro, is what Chapter 1 of Arclight was focused on, providing us a decent sized scope for the Fall term, and giving us room to expand later. Also, who wouldn't want to work on a spell-slinging archmage hehe.
Since we didn't quite have a color palette decided, and I wanted to work on procedural animations as a development goal, I did all of the art using 4 shades of black and white. This would allow me to keep the decision making of color out of question, really nail the perspective and shading, as well allow us to change the colors in engine with the shading additively applying to the albedo of choice. In retrospect, it was a lot of work having to split the sprites into 3 categories: Hood, Legs, Eyes. This meant I had to animate all of them on separate layers for all 8 cardinal and inter-cardinal directions, then figure out a way to composite all 3 layers later in Unity. Challenge accepted.
Iro, the Archmage:

Player Controller:
The next step in the development process was to engineer a functional player controller. I wanted my focus this semester to be on Procedural Animations.
In all of my University projects, I always try to focus on creating everything from scratch. Not because I don't know better, but more so to better understand the ins-and-outs of a variety of systems. For this game, I really wanted to focus on creating a very solid foundation to move upon. Since the game wasn't going to be heavily physics-based, I decided to derive off of Unity's CharacterController as it had more robust movement calculations that weren't reliant upon physics but could simulate them as I needed (not to mention that it already had step height calculations, and our art style is voxel-based). I already have had extensive experience making Player Controllers from the RigidBody component, using physics, so I wanted to explore other options. This also allowed the Level Designer in our group to have more lenient rules for creating and designing the layout.
Final Product:
First I started by writing the movement logic of the player using ScriptableObjects. I did this so that during specific interactions or sequences further down the line of development I could effectively have the same input and state machine system, meaning I only need ONE Update Loop for input. With each movement state being its own object I can use Dependency Injection to apply different movement behavior to the character for specific events. Some examples might include the differences between non-combat movement where the player might be walking through buildings talking to NPC's and need more tight controls, the other being combat movement where the player might need to be a little more speedy and have a farther dash.
I chose the Singleton pattern and ScriptableObjects so that nothing would have to be linked to the player and vice-versa. This allows for input to be handled differently during different situations. For example, when the player presses pause, I can inject the menu state which takes all of the input and assigns the correct event responses to the input. The following screenshots are of the State Machine, Non-Combat State, and the Input Manager. Note that within the non-combat state there is also a MovementState, and an InteractionState.
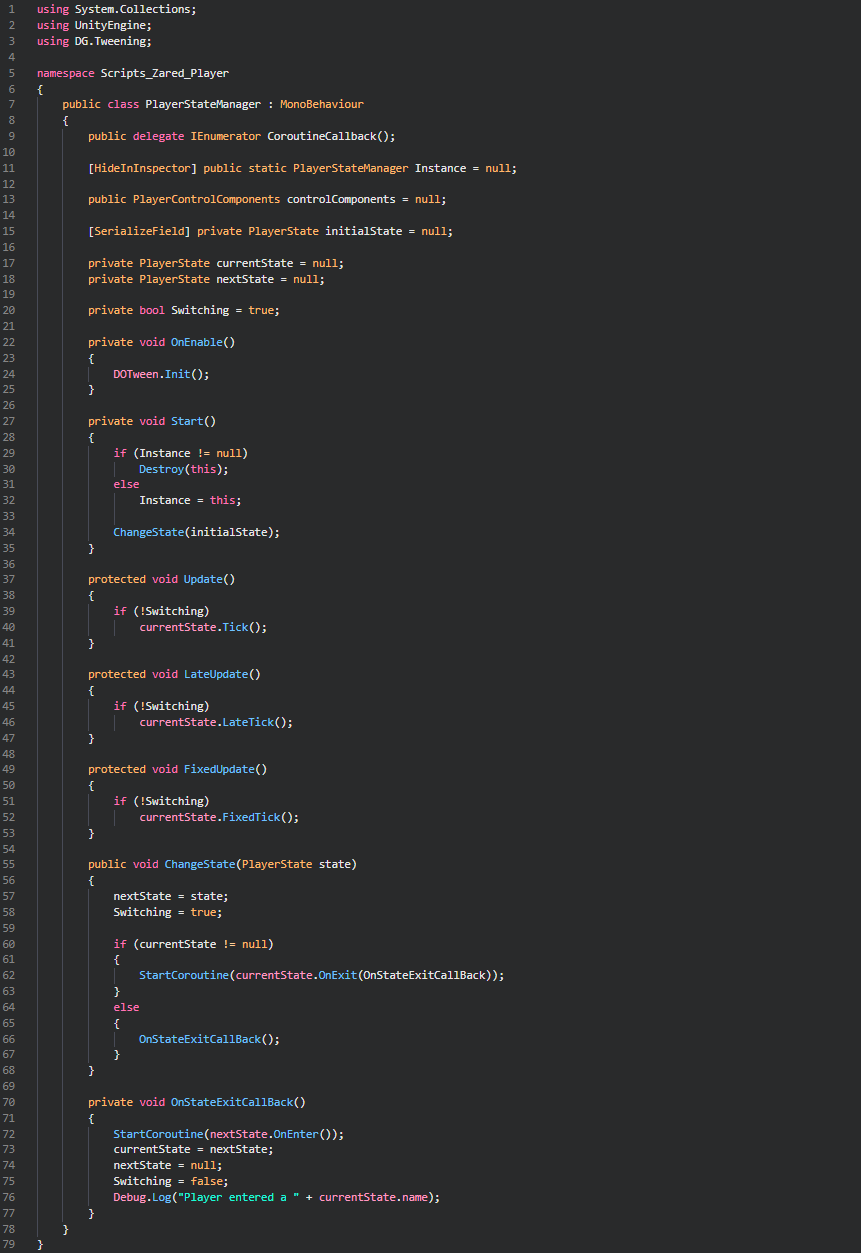
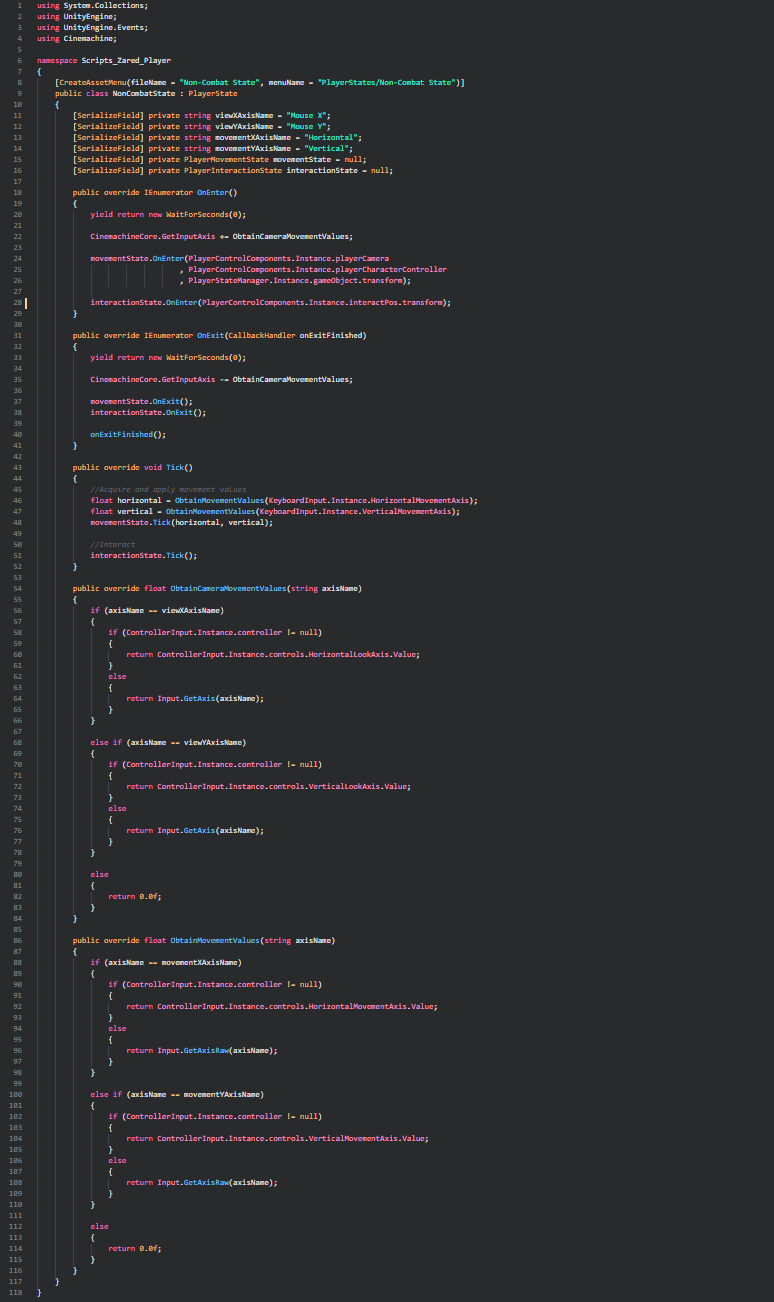
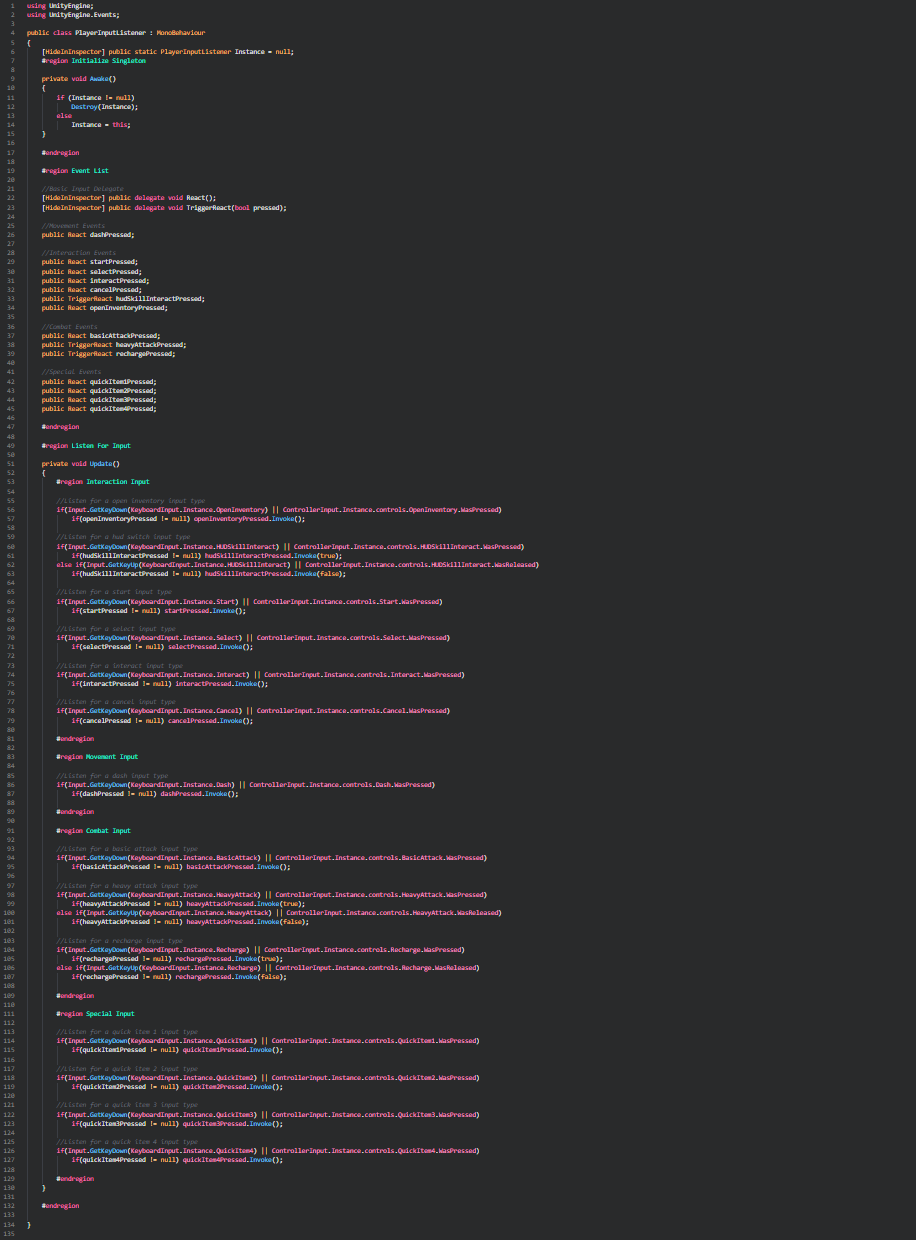
I found that approaching the player state machine this way allowed for an extreme level of control, and the use of dependency injection allowed smooth transitions between states without having to swap a different player controller in the scene, change the movement values, and ample other unnecessary calculations. This approach simply allowed us to subscribe/unsubscribe to different input events, and since every bit of input in the game was entirely event-based (void movement axis) this was very easily achievable. Having the OnEnter and OnExit methods during transitions also allowed for other neat features such as having transition animations play or temporary invulnerability, and plenty of other examples had we gotten to them.
Of all the features in the Player Controller, the two that showed to be the most impactful and recognizable during playtesting were the procedural animation style and the dashing. Quite literally ALL of the feedback we got mentioned the dashing in high regard, most saying it was addicting and easy to spam because it felt so good.
For the semi-procedural animation of the player's art, I decided to use the dot product of the vector pointing from the Camera to the Player versus the Forward and Right vectors of the player. If done properly I should be attaining some values on both the X and Z axis that should be between -1 and 1 respectively for each vector component. From those values, I can easily determine which cardinal or inter-cardinal direction sprite sheet I should use and blend between.
As for the dashing, this one was much more simple. Essentially, I calculated the movement direction, then just determined a point in that direction that was the outcome of taking the movement direction vector, multiplying it by some distance, then tweening the player to that point. There were some complications of this approach such as tweening to a point within some geometry. I fixed this by casting in that direction and distance and if I hit anything static, I took that hit point and moved to an offset equal to the width of the player, then calculated the dash time proportionately to the amount of distance I lost. This was so that the player didn't take the same amount of time to go 2m or 100m, but rather the same linear velocity regardless of distance.
Abilities & VFX:
Since Arclight chapter 1 is based around Iro, the sword slinging archmage, VFX are a heavy component in making the abilities feel magical.
In total, Iro has 4 major abilities. He can conjure weapons; and in two separate ways. The first of which resulting in daggers warping above him and firing in the direction the player is aiming, piercing through anything in their path. The second of which Iro summons a sword above and swings down in the opposite direction across his body. These two abilities provide the player with the option of pursuing or retreating from combat depending on the situation. The way the combat system was implemented, and in order to keep it fast-paced, it was important for the player to have a ranged ability to counter the close-range melee attack. We wanted Iro to be a versatile conjurer. The third ability Iro has is a simple heal since he predominantly focuses' on being a combat mage, it became very easy for the player to be overwhelmed by enemies resulting in death. The healing ability has a larger cooldown than the rest of the abilities to allow room for failure; though, it is a very generous heal. The fourth and final ability is the dash. Dashing allows for quick decision making whether its to exit or enter combat in a pinch. It also helps with moving around the map quicker. There is no cooldown on the dash, just the amount of time it takes to actually complete the dash.
Dashing Sequence:
The dash VFX particle system is made up of three separate sub-emissions. The particle system chooses random albedo values between the two shades of purple and blue. on spawn for all three. The sub-emitters fire on death, examples below are in order from left-right (top-bottom on mobile).
Healing Sequence:
The heal VFX particle system is made up of two separate yellowish sub-emissions. The sub-emitters fire on use and the examples below are in order from left-right (top-bottom on mobile). I wanted the heal to feel as though it was a powerful burst of mana that left a comforting and resonating aura.
Combat Abilities:
Both attacks fire in the direction the camera is facing. I wanted it this way as Iro is a conjurer, so it would make sense that he has complete control over the items he is summoning and can attack around a full 360 degrees. Compared to the likes of a warrior who has to physically swing a sword, Iro can magically swing his sword. Because of this, Iro can also propel his daggers in any direction using similar techniques to his swing. The art of weapon conjuring is magic specific to Iro.
Along with the player sprite rendering, the combat attacks are also procedurally animated. With enough linear interpolation, vector calculations, and raycasting, the abilities pop in the swords and swing around Iro's body in the direction the camera is facing, or pop in the daggers and tween them forward and through anything in their path also in the direction the player camera is facing. More on how they interact with enemies in the next section.
Combat System:
My idea for the combat system in Arclight was to keep it engaging and fast-paced, but not by requirement. To promote this, I made it to where the damage the player does compounds with the more concurrent hits the player lands. This becomes extremely beneficial when the player is fighting a beefy enemy. For example, if the enemy has 100,000 health Iro starts out by dealing 15 damage on the first swing or 10 damage on the first dagger throw, which in comparison to the boss's health is basically zero. BUT, due to the nature of the compounding damage, the player has a small amount of time before that compound multiplier disappears. If the player attacks within that amount of time, the damage is compounded with the percentage of health the current compounding damage is in proportion to the enemy's current health. This makes it extremely easy to take down a big enemy in a small number of attacks IF the player can avoid being hit (very unlikely). This is an extreme example that you can see in action below. The rest of the enemies have 100 health, the last enemy that takes a while to kill has 10,000. Reminder: the sword swing only does 15 damage, and the dagger throws only do 10. As the red bar gets larger, the actual damage Iro is dealing is increased tenfold.
As for how the damage is actually applied, during the procedural animations, you can see that multiple raycasts are being fired along with the attack from artisanally placed transforms along with the daggers and swords. This turned out to be much more reliable than using colliders, as on less powerful devices the speed of the attacks would cause the collisions to sometimes not register. We pivoted as the feedback from playtesters was that the chance of a clear hit actually missing was more annoying than anything else. Because of the perspective of the camera, and the fact that Iro is 2D and not 3D, I increased the range of the cast to make it seem like the damage is dealt naturally, but really the raycasts are reaching fairly far out. This extra distance is what made the combat feel just right, and not hyper-realistic.
User Interface:
In terms of UI, I was in charge of taking care of the Player's HUD (since I already had most of the power over the player), and the Main Menu. I took care of the Main Menu last, and the player HUD first. Partially because I wanted to have something to move off of when it came to the player's skills and attaching the framework to the HUD itself, but also because if we had most of the game made I could very easily get a feel for the aesthetic I wanted to shoot for with the Main Menu. We knew that Auria, the setting of the first chapter of Arclight, was a snowy mages college up in the northern parts of the realm (totally not Winterhold).
The player HUD was overall very simple, and aside from making the UI custom in photoshop, it was a very usual HUD setup, nothing special. As for the main menu, it is one of my more proud creations.
The first step for creating the main menu was to set the scene. I wanted heavy snow, volumetric lighting, and a sense of magical aura that would place the player in the world before the game even started. The snow is a particle system with heavy emission, noise, and collision (fun fact: All of the particles were made from the same 32p x 32p black and white sprite). Of course, because particle collision is a very costly interaction, I needed to do some optimizing. I reduced the geometry of the college scene by about 100,000 tris. Below is the scene essentially empty, along with some geometry moved around for emotional setting.
After the geometry of the scene and the perspective felt right, the next step was to add some volumetric lighting. I used a free plugin called Aura to achieve this in Unity, as there is no built-in solution, and creating one from scratch in the given time was not viable. This plugin gave me plenty to work with and was so robust that I actually ended up purchasing the full version (Aura 2) to really push the scene and the plugin to their fullest potential. Below is a screenshot of the volume set-up.
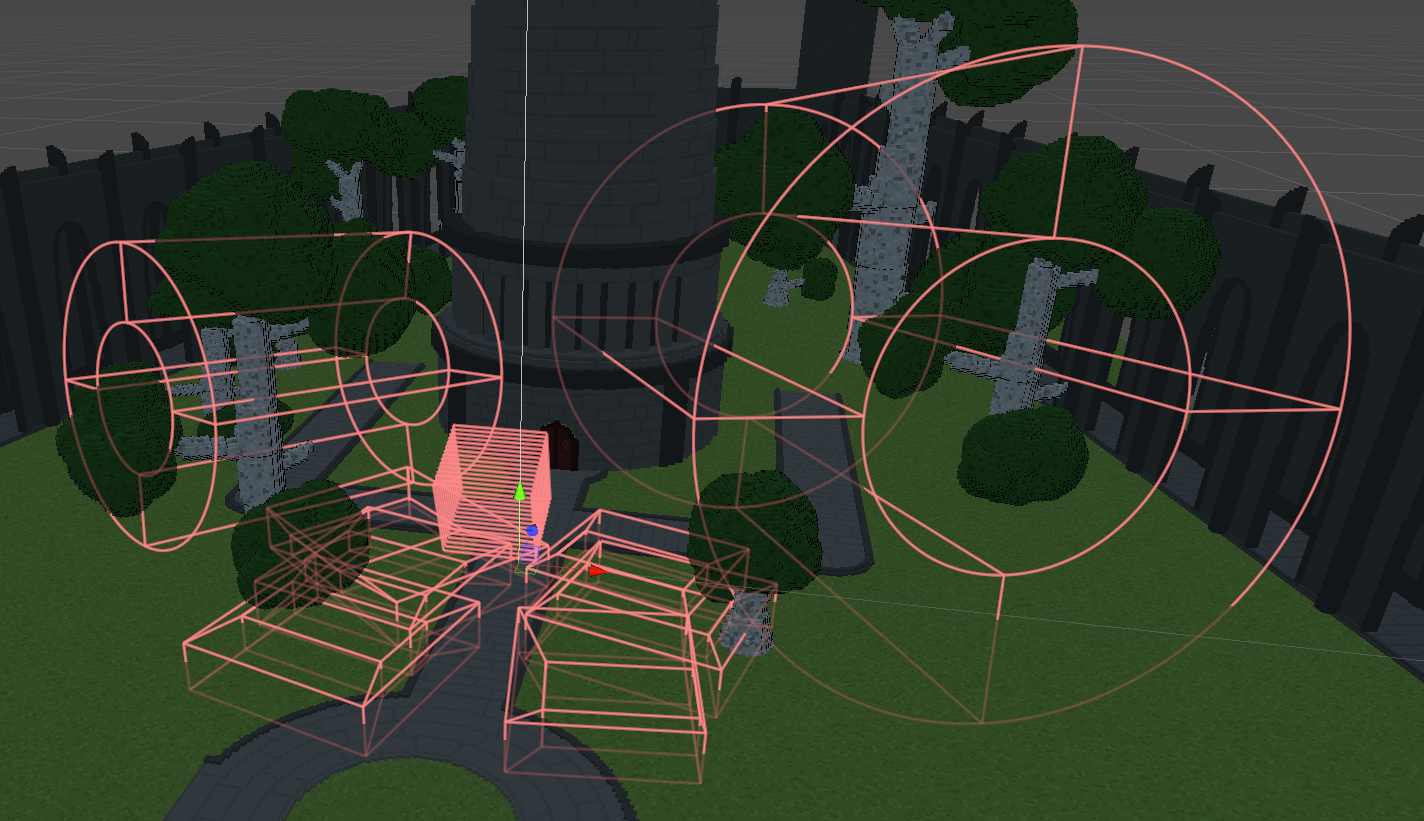
For the viewport, I used Cinemachine virtual cameras in order to apply noise as if it was a heavy blizzard. This did an ample amount for placing the setting. The first is at the base of the archmage's tower and is lower to the ground with a heavy sway to match the darker ambiance of that perspective. The second is further forward and slightly above the first, pointing at the magic crystals on the archmage's tower. I left room on the upper left side of the screen where the light source is strongest for the most amount of contrast with the UI options. From there, it was a matter of changing the priority of each virtual cam in order to smooth the transition between the different perspectives.
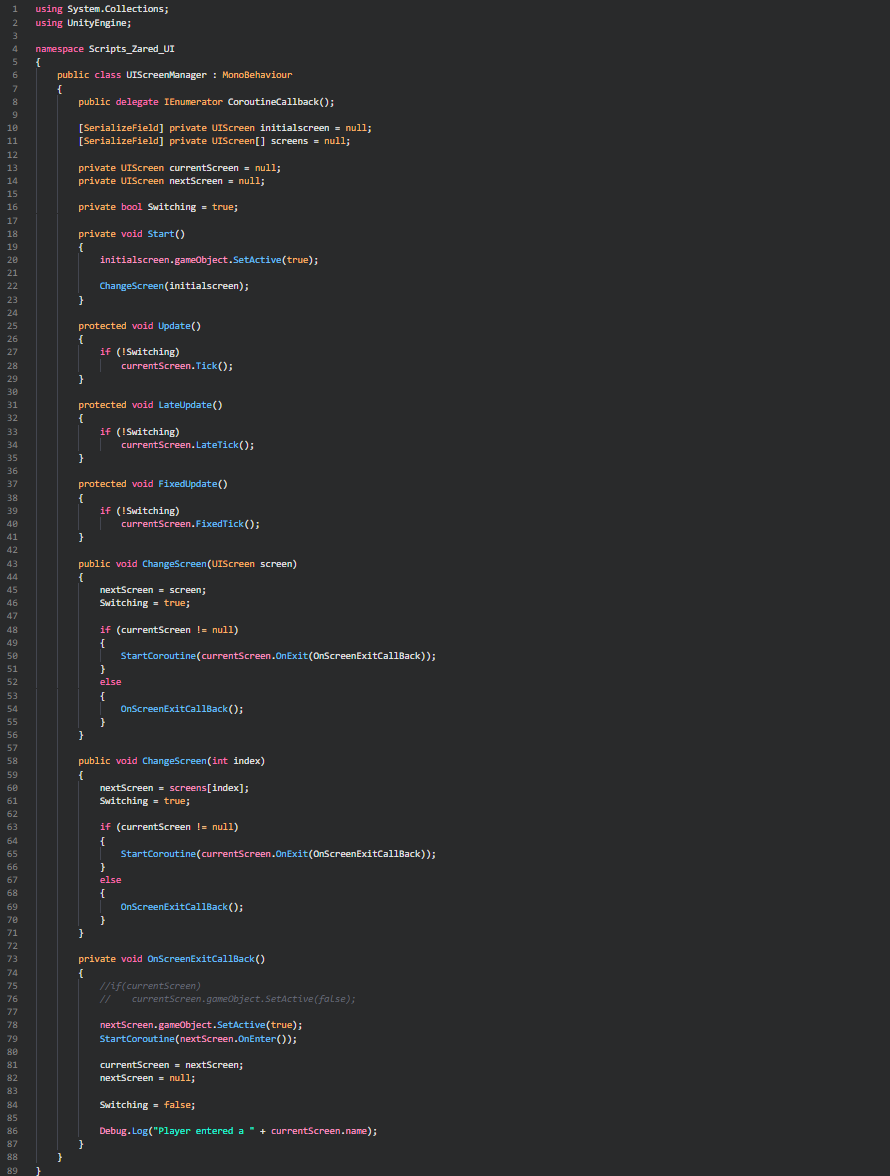
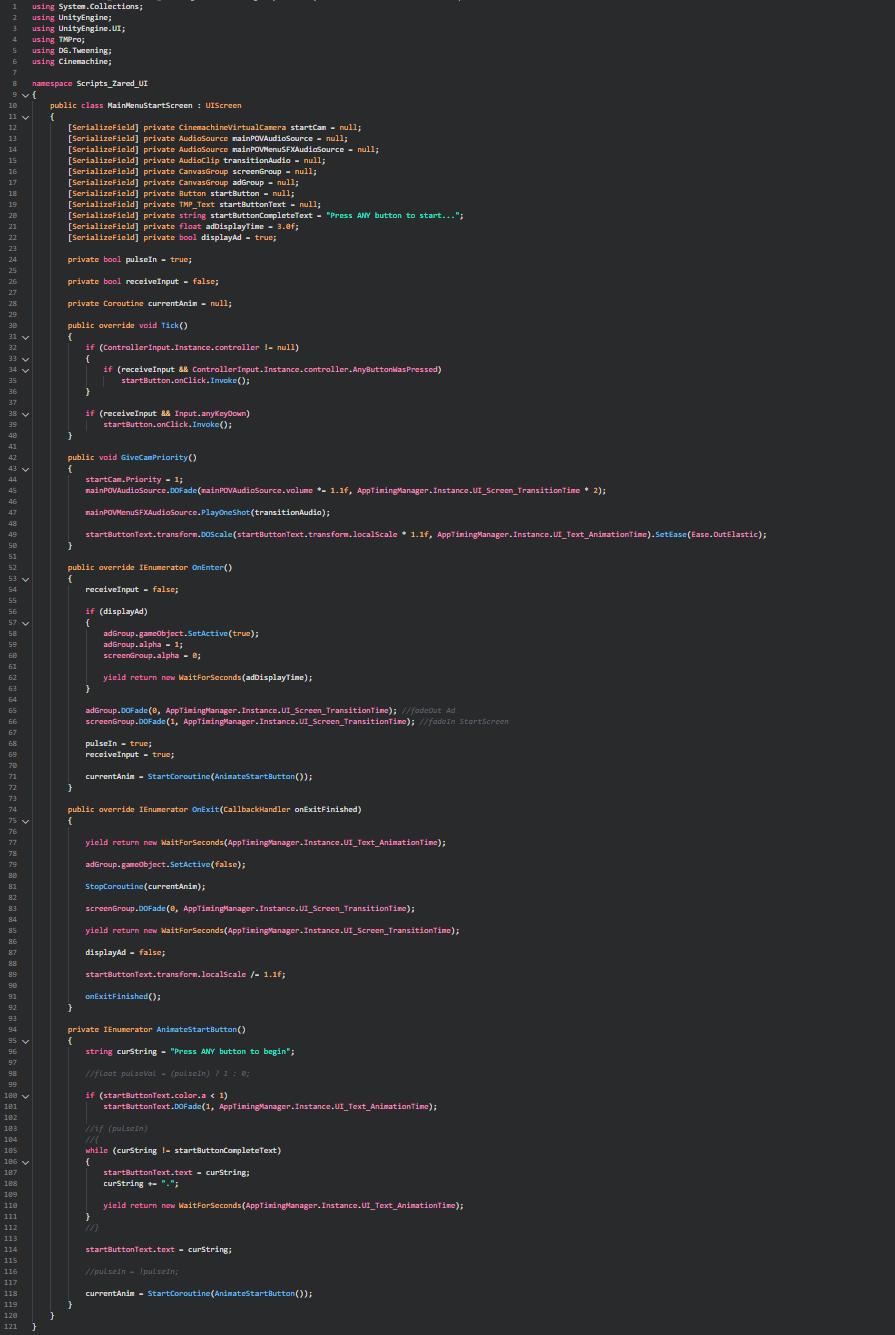
Of course to control all of it I had to implement a small UI framework, which is used by ALL UI in the game. This also allowed me to make each screen have its own behavior and easily transition between them based on input. The base of the framework consisted of the IUIElement interface, the UIScreenManager state machine, and the UIScreen base for all screens in the game .Below are some screencaps of the UI State Machine, and the initial Start Screen for simplicity (the menu UI state is a bit long for a decent sized screencap, and I'd be happy to further discuss if interested).
Lastly, I added some wind blowing audio and designed the UI cursor to feel more magical. As the camera moves the wind audio fluctuates. When the player moves perspectives to the tip of the tower shot, the wind becomes slightly louder to directly correlate with the extra height and the camera sway relaxes so that the UI elements aren't shifting, which could be a potential cause of involuntary motion sickness.
Main Menu Final Product:
Zared Redding © 2019